A water leak can feel minor until it spreads, so knowing what to do after water leak in wall situations can save time, materials, and stress. The right response depends on whether the leak is active, how long it ran, and what type of wall assembly is wet (drywall, plaster, masonry, finished basement). In this guide, you will learn the immediate safety steps to take, how to tell active leakage from leftover moisture, who to call for water leak in wall problems, and how to dry a wall correctly so moisture does not linger inside the cavity. You will also get practical guidance on when removal is necessary, how to prevent mold, and what to document for insurance.
- Prioritize safety: shut off water if needed and avoid electrical hazards near wet walls
- Confirm whether moisture is ongoing or just drying out from a past event
- Stop the source first, then start controlled drying with airflow and dehumidification
- Know when baseboards, drywall, and insulation should be opened or removed
- Document damage early so repairs and insurance decisions are easier later
Quick steps to take immediately
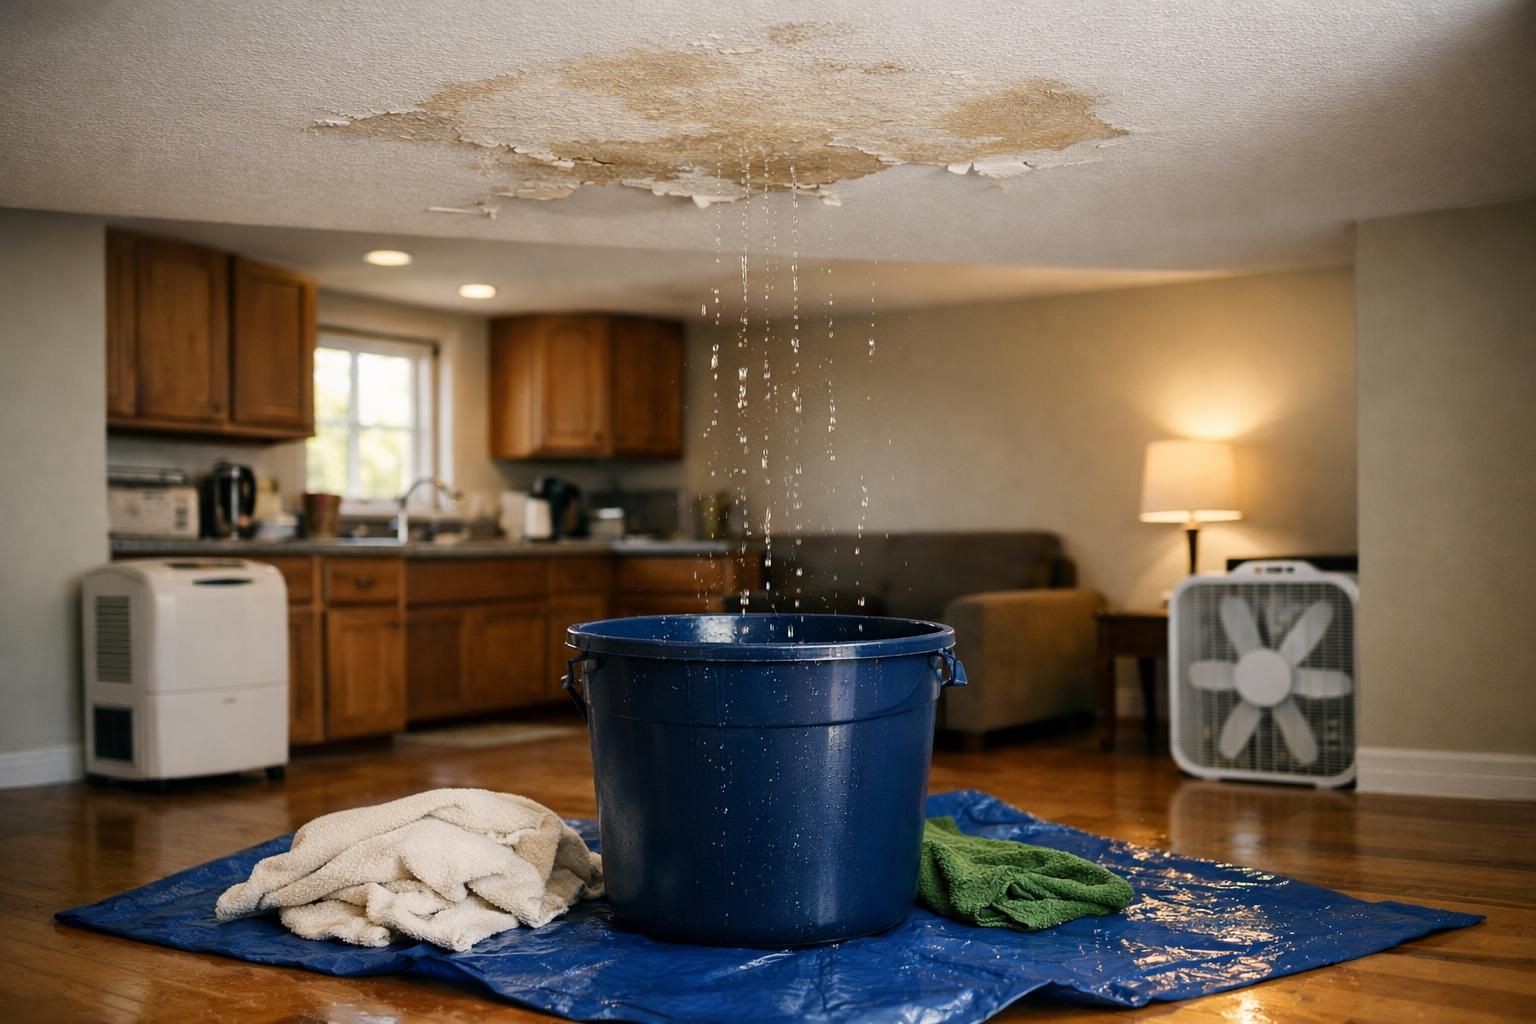
Start by treating any wet wall as a safety issue. If the leak is near outlets, switches, or electrical panels, keep people away from the area and avoid touching anything wet. If you can do so safely, turn off power to the affected room at the breaker. Next, find and stop the water source if it is supply plumbing. Shut off the nearest fixture valve or the home’s main water shutoff.
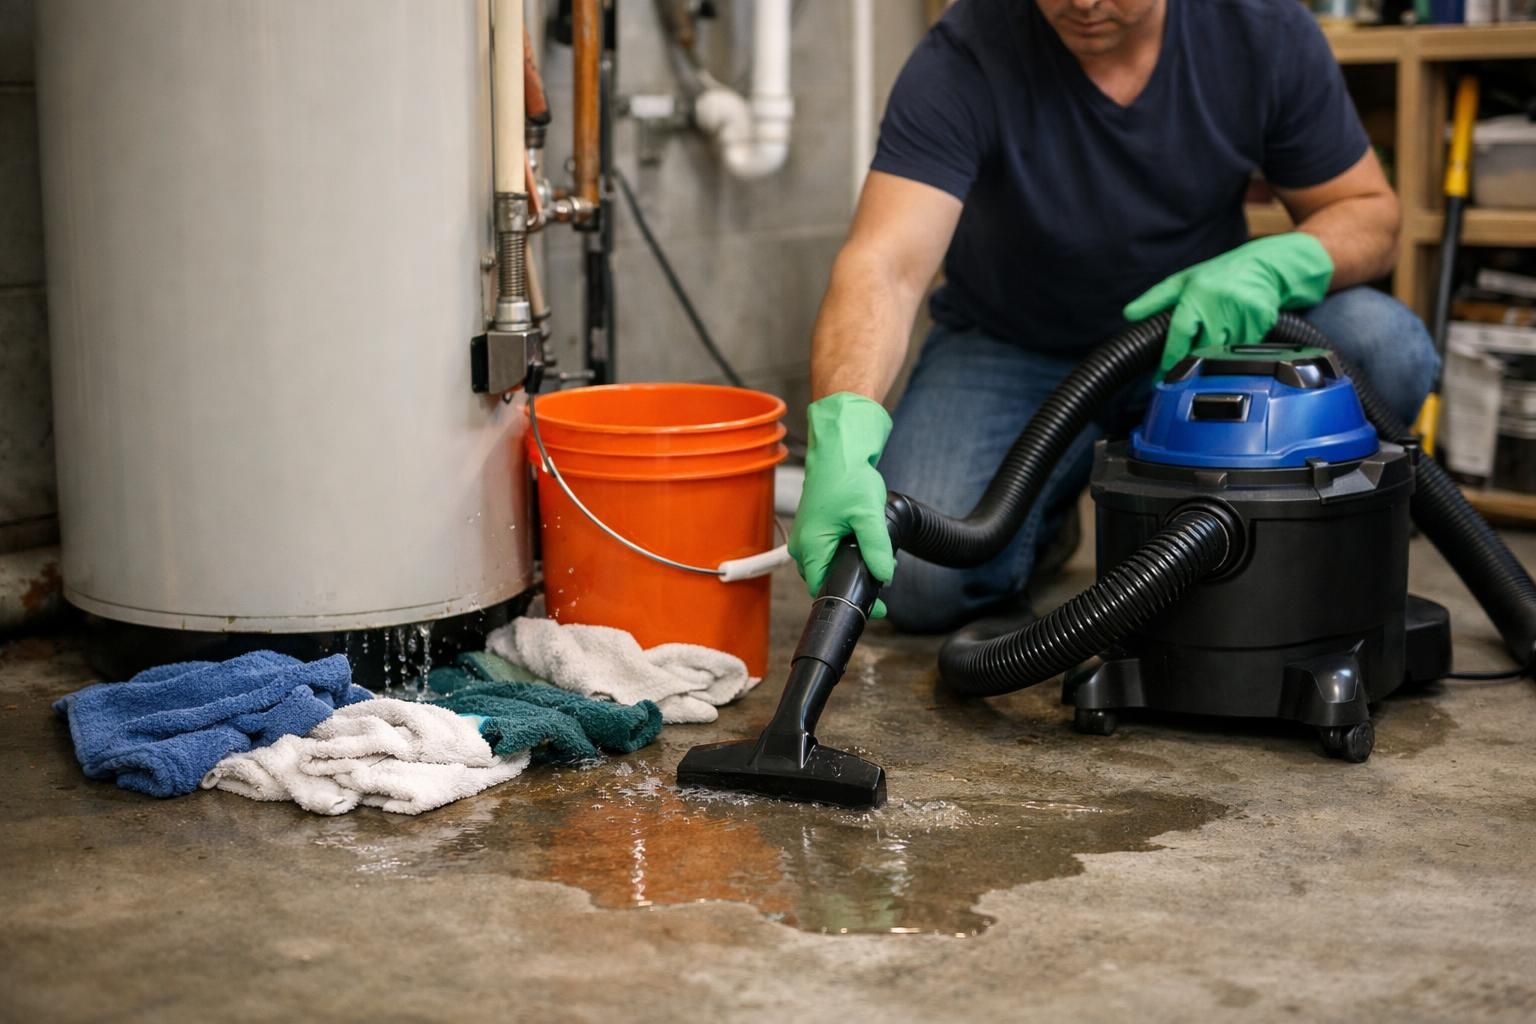
Then protect the space and limit spread. Move furniture away from the wall, lift rugs, and place towels or a shallow tray to catch drips. If water is pooling on the floor, remove it with a wet vacuum or towels so it does not wick into baseboards and framing. Open windows if outdoor humidity is lower, and start airflow with fans, keeping them aimed across the room rather than directly into a saturated wall.
Signs the leak is still active vs leftover moisture
Active leaks usually show changing symptoms. Look for new dripping, a stain that grows over hours, or water that reappears after you dry the surface. Press a paper towel against the damp area and check again in 15 to 30 minutes. If it becomes wetter without any drying effort nearby, the leak is likely ongoing. Listen for hissing near supply lines, and note whether the issue worsens when a fixture is used or when it rains.
Leftover moisture tends to stabilize and slowly improve with drying. Stains may look darker at first, then lighten around the edges. Paint can blister or drywall can soften even after the leak stops because moisture is trapped inside. In basements, a water leak in basement wall areas can also be from condensation or seepage that follows weather patterns. A crack in basement wall leaking water often appears after rainfall or snowmelt, while plumbing leaks can occur regardless of weather.
How to stop the leak (and who to call first)
Stopping the source is the priority, because drying without stopping the leak rarely works. If you suspect supply plumbing, shut off water at the main and call a licensed plumber. If the leak appears only during or after rain, you may be dealing with roof, siding, window, or foundation entry. In that case, consider a roofer for attic or roofline symptoms, or a waterproofing or foundation specialist for basement seepage.
If you are unsure who to call for water leak in wall issues, use the clues: plumbing leaks are often tied to bathrooms, kitchens, laundry lines, or hot water heaters, and can happen any time. Exterior intrusion often aligns with storms, clogged gutters, missing flashing, or grading that directs water toward the house. For a crack in basement wall leaking water, a foundation professional can assess whether it is a structural crack, a shrinkage crack, or a pathway for hydrostatic pressure.
In many homes, you may need two tracks: stop the leak and manage the wet materials. A restoration or water damage company can help with moisture mapping, drying strategy, and controlled demolition if needed. Their job is not the permanent repair of plumbing or foundation in most cases, but they can stabilize the situation so repair work can proceed without hidden moisture.
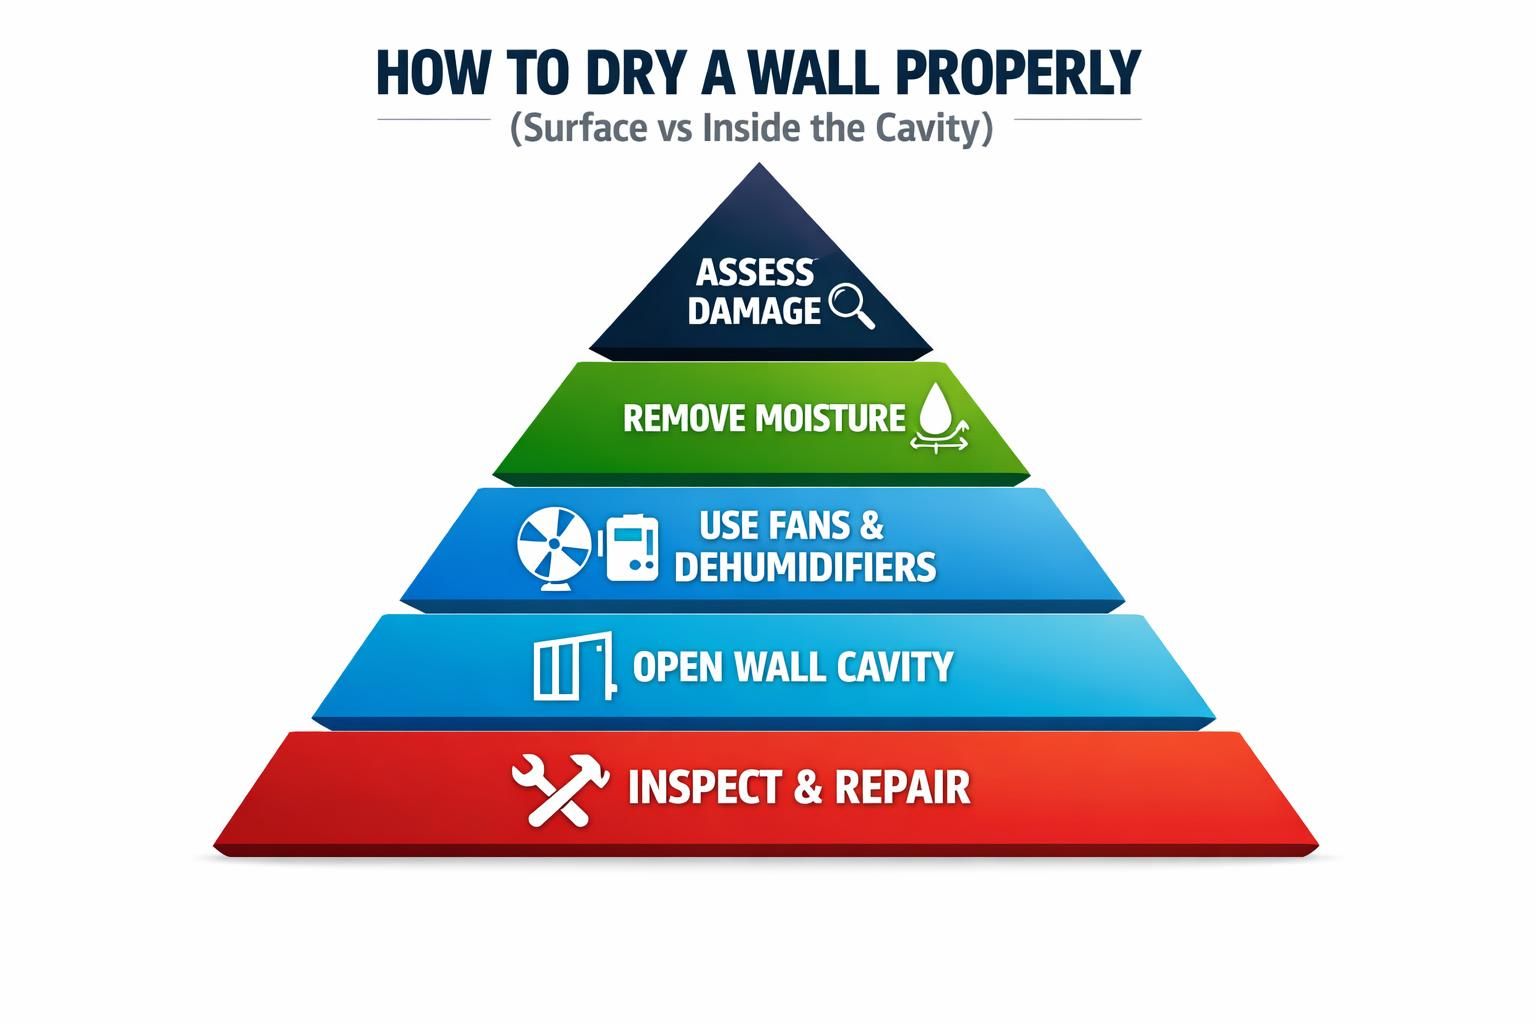
How to dry a wall properly (surface vs inside the cavity)
Drying a wall is not just about making the surface feel dry. Paint and drywall can trap moisture inside the cavity, where studs, insulation, and the backside of drywall can stay damp. Start with what you can do immediately: run a dehumidifier in the affected area, keep the interior door open if it helps airflow, and use fans to circulate air across the room. Keep HVAC running if it reduces indoor humidity, but avoid forcing humid outdoor air inside in muggy conditions.
Leftover moisture tends to stabilize and slowly improve with drying. Stains may look darker at first, then lighten around the edges. Paint can blister or drywall can soften even after the leak stops because moisture is trapped inside. In basements, a water leak in basement wall areas can also be from condensation or seepage that follows weather patterns, necessitating water damage restoration. A crack in basement wall leaking water often appears after rainfall or snowmelt, while plumbing leaks can occur regardless of weather.
To dry inside the cavity, you often need a pathway for air exchange. If the wall was significantly wet, surface drying alone may be slow or incomplete. Watch for lingering musty odors, persistent cool damp spots, or baseboards that stay swollen. In finished basements, moisture can travel horizontally along bottom plates and behind trim, so a water leak in wall can affect a longer stretch than the visible stain suggests.
- Run a dehumidifier continuously and empty it as needed
- Improve airflow: fan across the room, not directly into the wettest spot
- Remove wet items nearby (rugs, cardboard, stored belongings) to reduce humidity load
- Check adjoining areas, including the other side of the wall and the floor below
When to remove baseboards or cut an access opening
Baseboards can trap moisture at the wall’s lowest point, especially where water wicks upward. If the baseboard is swollen, separating at joints, or the drywall behind it feels soft, removing the baseboard can speed drying and reduce the risk of mold. Score caulk lines carefully, label pieces for reinstallation, and take care not to tear the drywall paper, which can complicate repairs.
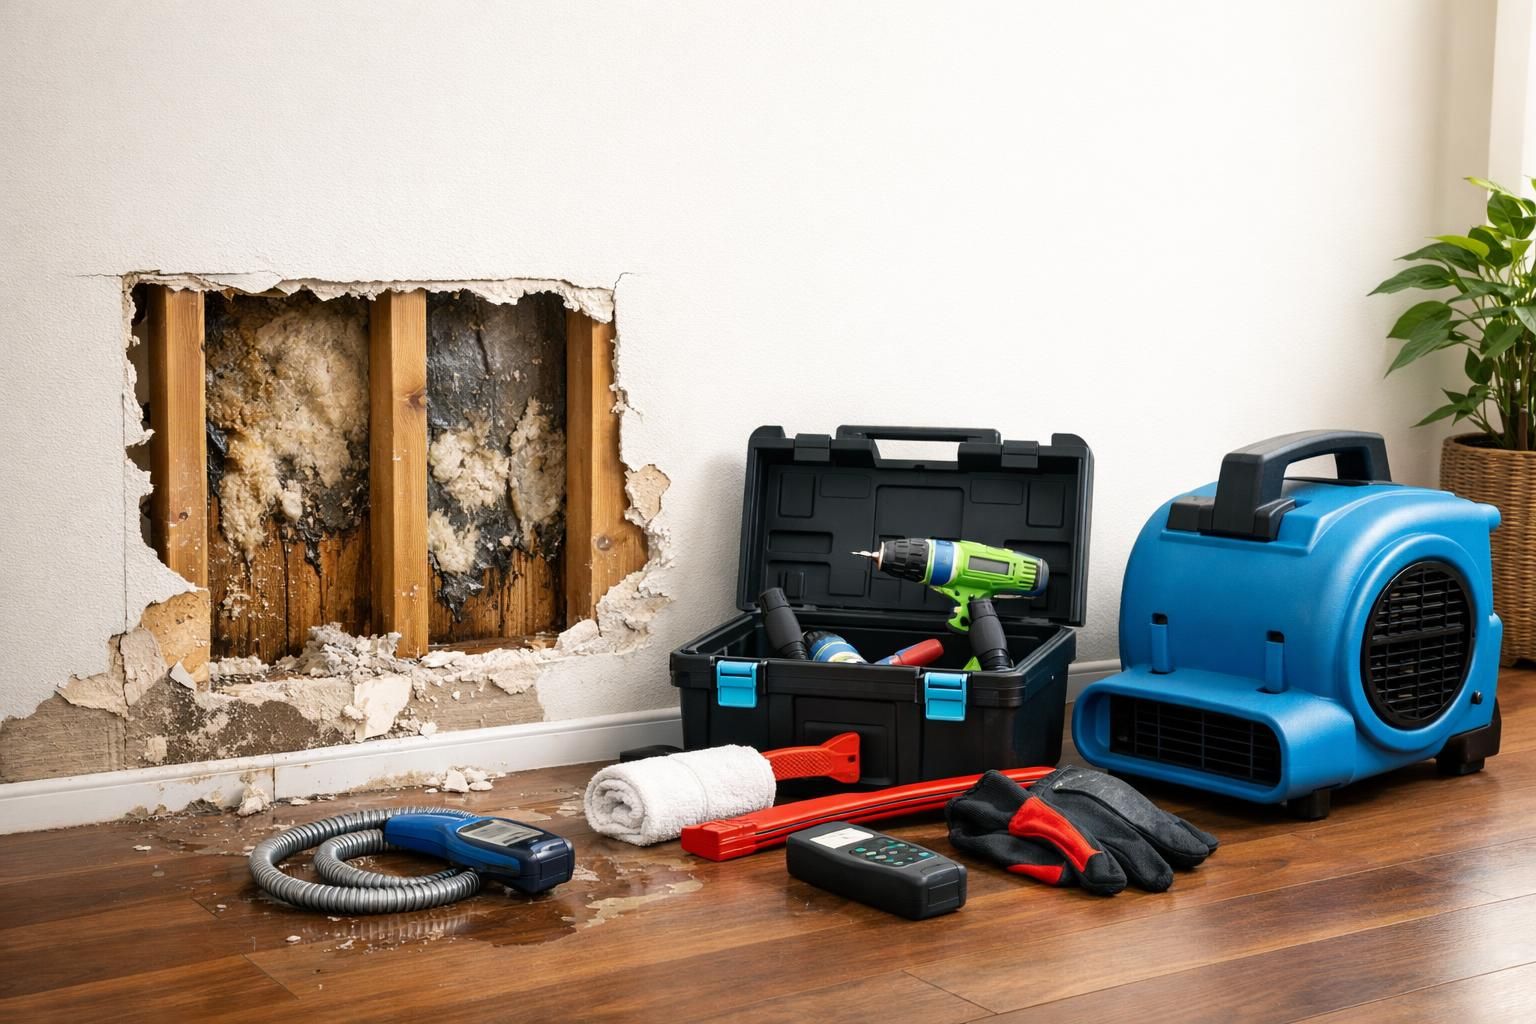
Cutting a small access opening may be appropriate when you need to confirm conditions inside the cavity or introduce airflow. A common approach is removing a narrow strip of drywall a few inches above the floor where moisture tends to collect, rather than cutting a large hole. The goal is to create a controlled drying path while keeping repairs manageable. If you smell mustiness, see discoloration on the backside of trim, or suspect insulation is wet, an access opening can prevent guessing.
How pros find hidden moisture (meters and thermal imaging)
Professionals typically combine visual inspection with moisture meters to map where water has traveled. A pin-type meter can read moisture within wood or drywall, while a pinless meter scans the surface and indicates relative moisture beneath. This helps identify whether a stain is superficial or if moisture extends beyond what you can see. Moisture mapping is also useful for deciding how far to open a wall if removal is needed.
Thermal imaging can highlight temperature differences that often correlate with evaporation and damp areas. It is a diagnostic tool, not a final answer, because cool spots can also come from air leaks or insulation gaps. Pros confirm findings with meter readings and, when necessary, small test openings. This approach reduces unnecessary demolition while still addressing the full extent of a water leak in wall cavities.
When drywall and insulation should be removed
Drywall and insulation removal becomes more likely when water exposure was heavy, prolonged, or contaminated. Drywall that is crumbly, sagging, or loses rigidity usually cannot be saved. If insulation is soaked, it can hold moisture against framing and delay drying, and some insulation types lose performance after getting wet. In basements, if you have a crack in basement wall leaking water that repeatedly wets the same section, removal may be necessary to address ongoing wetting and to inspect for hidden damage.
Contaminated water raises the stakes. If water came from sewage backup, a heavily soiled drain, or floodwater, porous materials typically need to be removed and discarded for hygiene reasons. Even with clean water, the decision often comes down to time and access: if materials cannot dry quickly and completely, removing them is sometimes the most reliable way to prevent mold and odor from developing behind the finished surface.
Contaminated water raises the stakes. If water came from sewage backup, a heavily soiled drain, or floodwater, porous materials typically need to be removed and discarded for hygiene reasons. Even with clean water, the decision often comes down to time and access: if materials cannot dry quickly and completely, removing them is sometimes the most reliable way to prevent water damage from spreading and odor from developing behind the finished surface.
Preventing mold behind walls
Mold prevention is mainly moisture control and time. The sooner you stop the leak and reduce humidity, the better. Keep indoor humidity low with a dehumidifier and maintain consistent airflow. Avoid sealing up a wall that may still be damp. If you opened the wall, allow it to dry fully before closing it, and confirm dryness with moisture readings when possible rather than relying on touch alone.
Also address why the wall got wet. For a water leak in basement wall situations, look at gutter downspouts, grading, and drainage patterns outside, since repeated seepage can overwhelm interior fixes. For plumbing leaks, consider whether pipe joints, failing supply lines, or fixture seals need replacement. Use mold-resistant materials where appropriate in basements and other moisture-prone areas, but remember that no material is a substitute for keeping the assembly dry.
What to document for insurance

Document early, before you discard materials or start major repairs. Take clear photos and short videos of the wet area, visible staining, damaged flooring, and any affected belongings. Capture wide shots for context and close-ups for detail. Note the date you discovered the issue, what you observed, and any steps you took to stop water and reduce damage, such as shutting off the supply or using a wet vacuum.
Keep a simple log of conversations and invoices. Save receipts for emergency supplies and any professional services. If you had to open a wall to dry it, photograph the inside conditions, including wet insulation, staining on studs, or visible water paths. If you are unsure who to call for water leak in wall documentation questions, your insurer can explain what they need, but you should still focus on preserving evidence of both the cause and the resulting damage.
Next steps: repairs and prevention
After drying and any necessary removal, plan repairs in the right order: fix the source, rebuild the wall assembly, then restore finishes. Replace damaged trim, patch drywall, and prime and paint only after you are confident the cavity is dry. If the leak involved a basement wall, consider whether you need a longer-term solution such as sealing cracks, improving drainage, or addressing grading so the issue does not return with the next storm.
Baseboards can trap moisture at the wall’s lowest point, especially where water wicks upward. If the baseboard is swollen, separating at joints, or the drywall behind it feels soft, removing the baseboard can speed drying and reduce the risk of mold remediation. Score caulk lines carefully, label pieces for reinstallation, and take care not to tear the drywall paper, which can complicate repairs.
Prevention is a mix of monitoring and maintenance. Periodically check under sinks, behind toilets, around appliances, and in basement corners for early signs of moisture. Maintain gutters and downspouts, and keep exterior water moving away from the foundation. If you experienced a crack in basement wall leaking water, monitor it over time and address changes promptly. A small recurring water leak in wall area is often easier to solve early than after materials have been repeatedly wetted.
Conclusion
Knowing what to do after water leak in wall problems comes down to four priorities: safety, stopping the source, drying the structure correctly, and documenting what happened. Treat the visible stain as a clue, not the full boundary, because moisture can spread inside cavities and along framing. If you cannot confidently identify the source, choose the right trade based on symptoms and timing, and consider bringing in restoration help for moisture detection and controlled drying. Your practical next step is to confirm the leak is truly stopped, set up dehumidification and airflow, and decide whether a small opening is needed to verify dryness before you close everything back up.