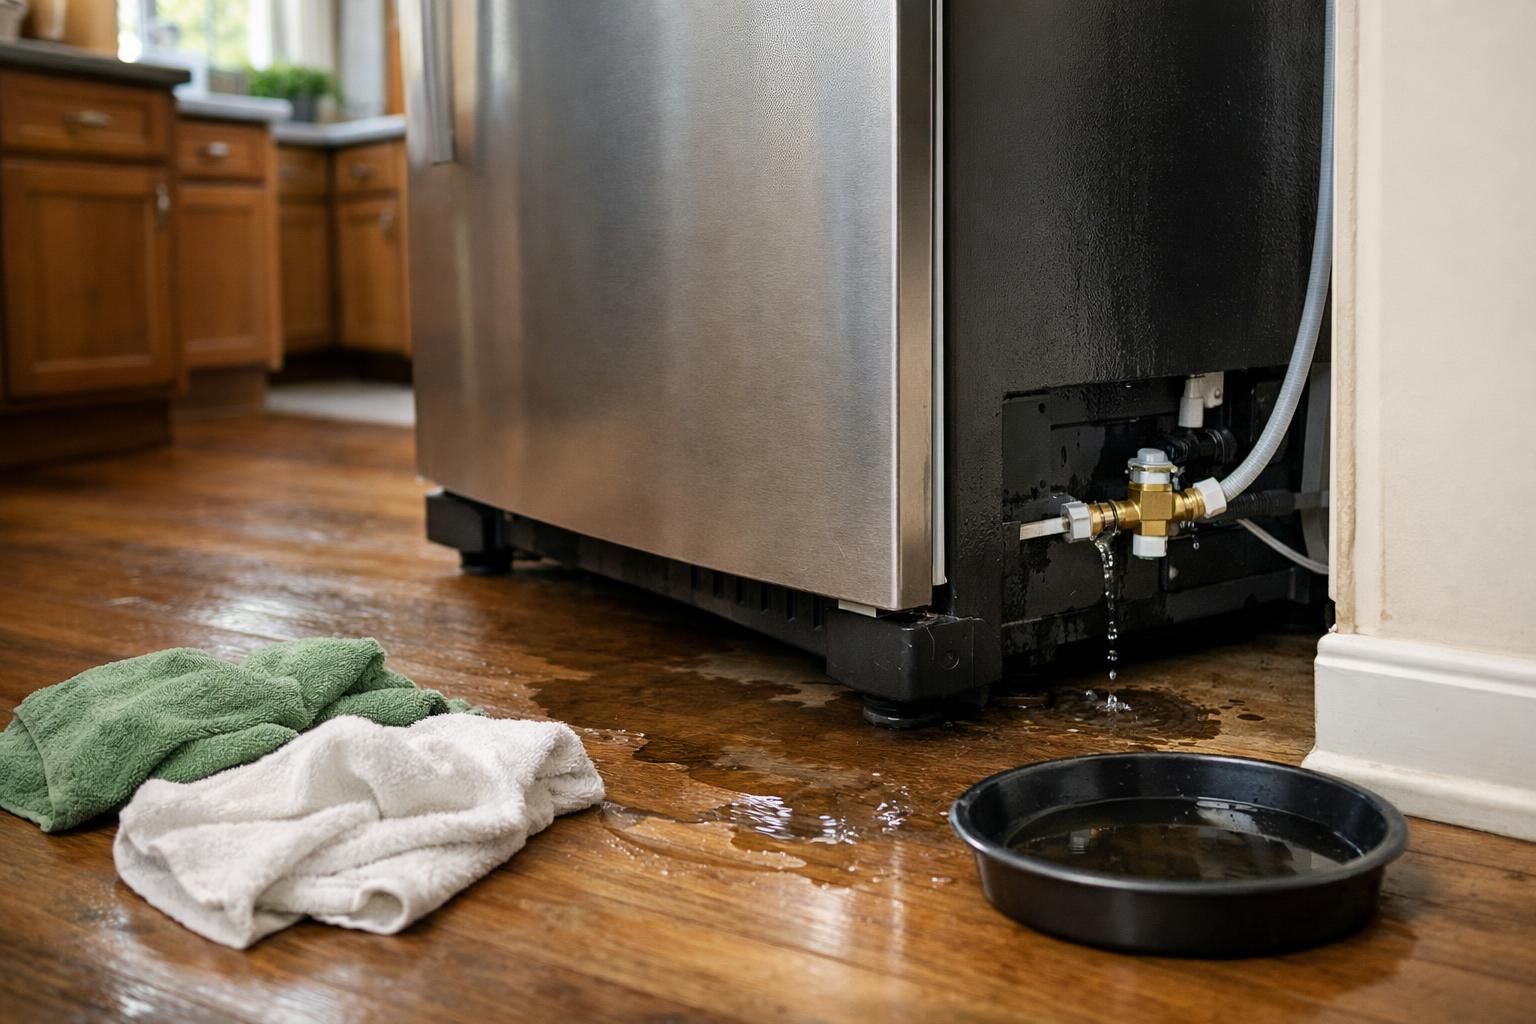
A refrigerator leak feels small until you see water behind the refrigerator or the flooring starts to cup. Refrigerator water line leak water damage usually comes from a loose fitting, a cracked plastic tube, or a failing shutoff valve, and the clock starts ticking the moment water hits wood, drywall, or laminate seams. In this guide, you’ll get a clear order of operations: how to stay safe, how to stop the source fast, how to dry the right way, what to save vs replace, and what to document so repairs and insurance conversations go smoother.
Best for: Homeowners dealing with a fresh fridge leak who can access the shutoff and start drying within the first few hours.
Not ideal when: Water has soaked into walls, under cabinets, or you smell mustiness, suggesting hidden moisture is already spreading.
Good first step if: You see pooling or damp flooring, because stopping the supply and removing standing water limits swelling and staining.
Call a pro if: Water reached electrical outlets, multiple rooms, or you can’t locate the shutoff and moisture keeps returning.
Quick Summary
- Most fridge leaks are supply line or fitting failures, so stopping pressurized water is your first win.
- Treat electricity and slippery floors as urgent hazards, especially on tile and vinyl.
- Drying works best with airflow plus dehumidification, not blasting heat at wet materials.
- Hidden water often travels under flooring edges and into toe-kicks before you can see it.
- Photos, notes, and saved parts help with repairs and any insurance claim review.
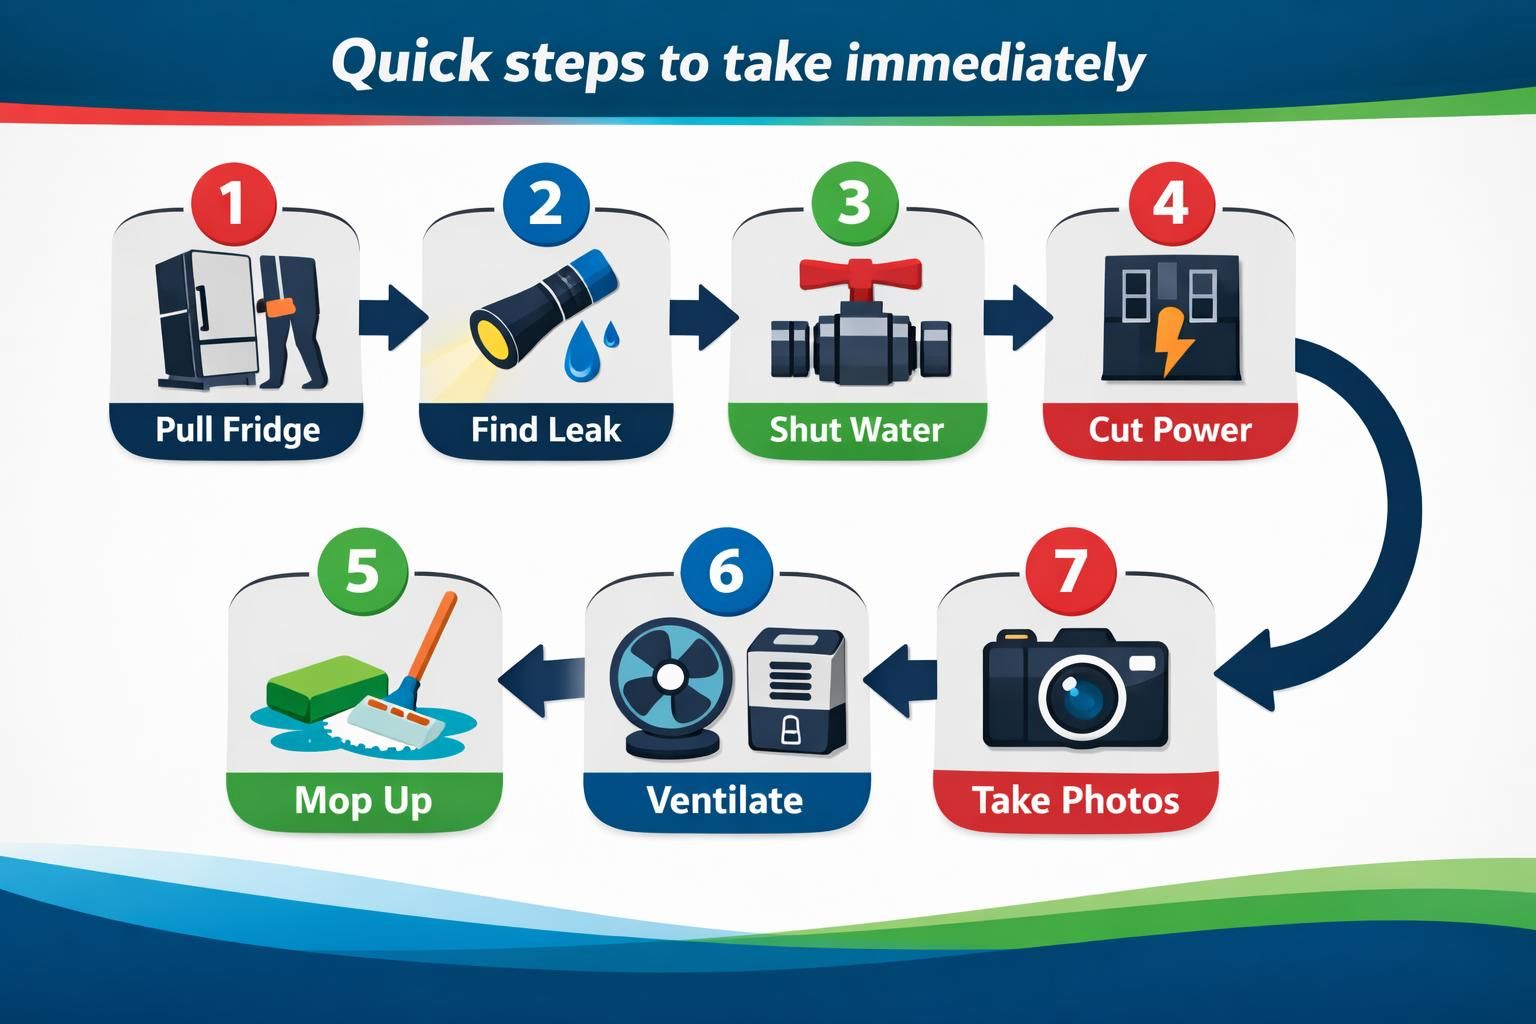
Quick Steps to Take Immediately
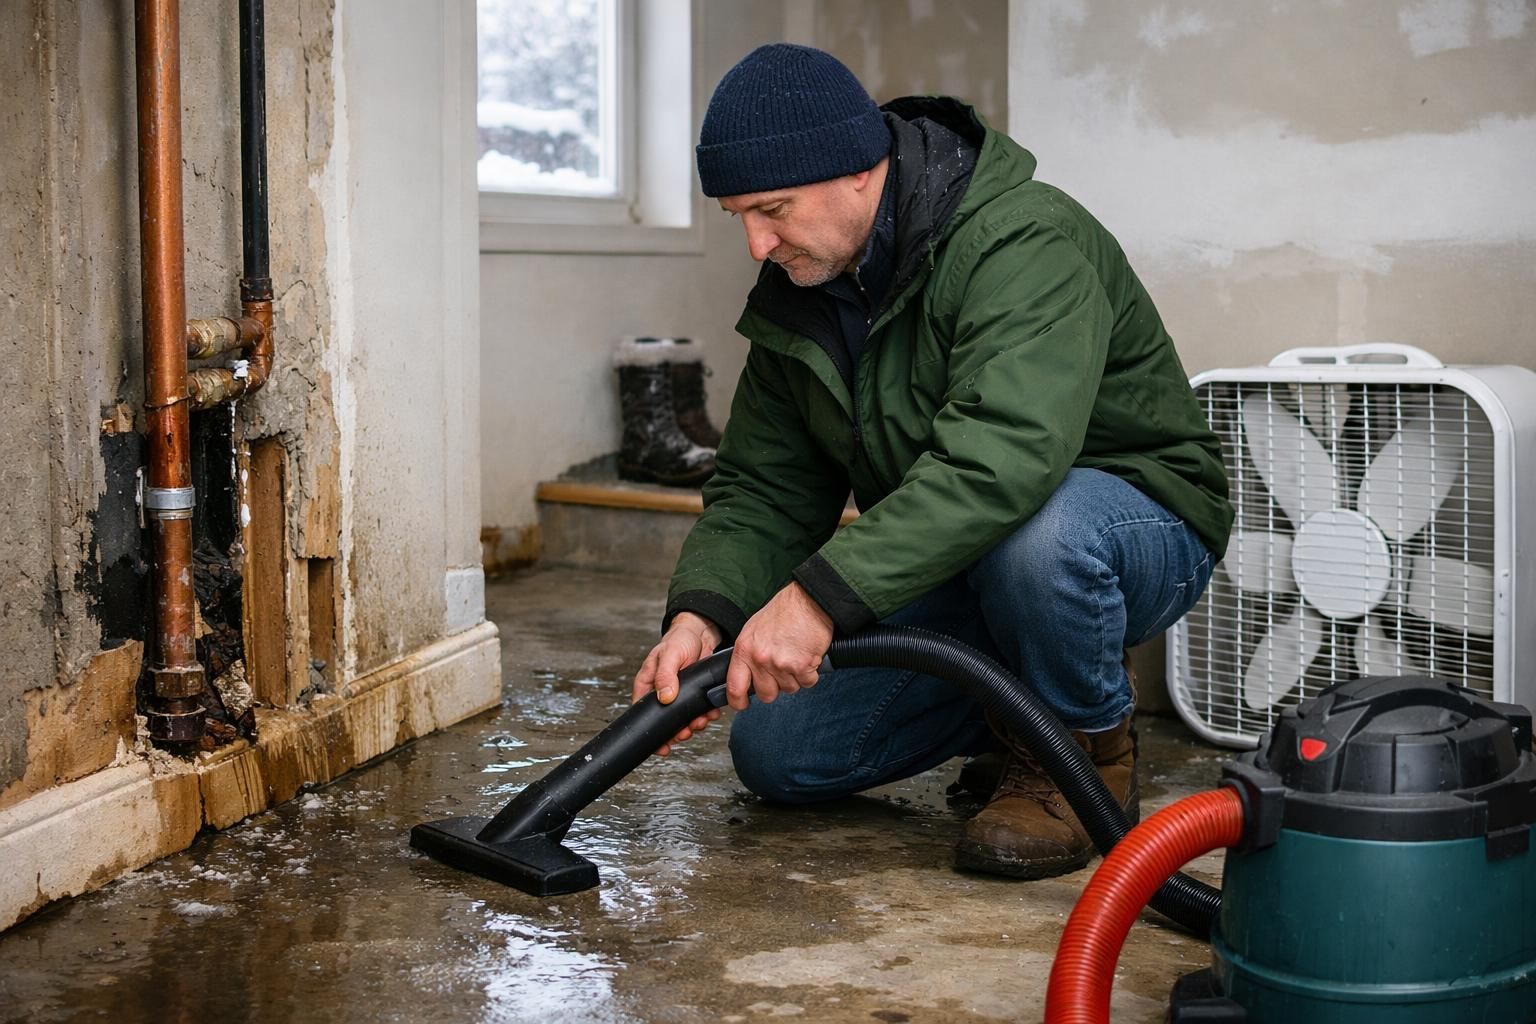
Move fast, but keep the sequence clean: stop water, reduce electrical risk, then clean and dry. Pull the fridge forward only as needed so you can see the line and fittings without kinking the tubing. Look for spraying, steady dripping, or a wet sheen on a copper line, braided hose, or plastic tube.
Contain the water so it doesn’t wick into seams or under cabinets. Use towels to dam the flow, grab a shallow pan for drips, and move items off the floor. If you see pooling, assume water has traveled beyond the visible wet spot.
Here’s the immediate checklist that prevents backtracking:
- Shut off water to the refrigerator line (or main if you can’t isolate it)
- If water is near outlets or the cord area, shut off power at the breaker
- Mop up standing water and pull off wet toe-kick panels if accessible
- Ventilate the area and start dehumidification as soon as possible
- Take quick photos of the leak source and the wet areas before you disturb too much, so you have a clear record for repairs, a landlord, or an insurance claim.
Safety First: Electricity
Treat the area as energized until you know it’s dry, because water can reach outlet boxes or cords behind the appliance. If water is near the plug, wall outlet, or a power strip, shut off the correct circuit at the breaker before reaching in. Avoid standing on a wet floor while touching metal parts of the fridge. Don’t rely on unplugging if you’d need to reach through water to do it. Restore power only after the area is dry and you’re confident water didn’t enter outlet boxes.
Safety First: Electricity, Slipping Hazards, and Water Type
Assume a wet kitchen zone can become an electrical and fall hazard in seconds. A powered appliance, nearby outlets, and a thin film of water are enough to create real risk, even if the leak seems minor.
Slip hazards are immediate on tile, sealed concrete, and vinyl. Put towels down where you need traction, walk slowly, and keep kids and pets out until cleanup is complete. If you’re moving the fridge, get help so you don’t twist while stepping on wet flooring.
Water type affects how hard you need to clean. A refrigerator supply line leak is usually clean supply water, but it can pick up dirt quickly under cabinets. If the issue is a clogged defrost drain or drip pan overflow, the water is often grimier and can support faster microbial growth. Wear gloves, plan to clean surfaces thoroughly, and avoid pushing contaminated water deeper into seams.
If you want a deeper, step-by-step way to decide when to cut power, this can help: turn off electricity after a leak.
Stop the Source (valves
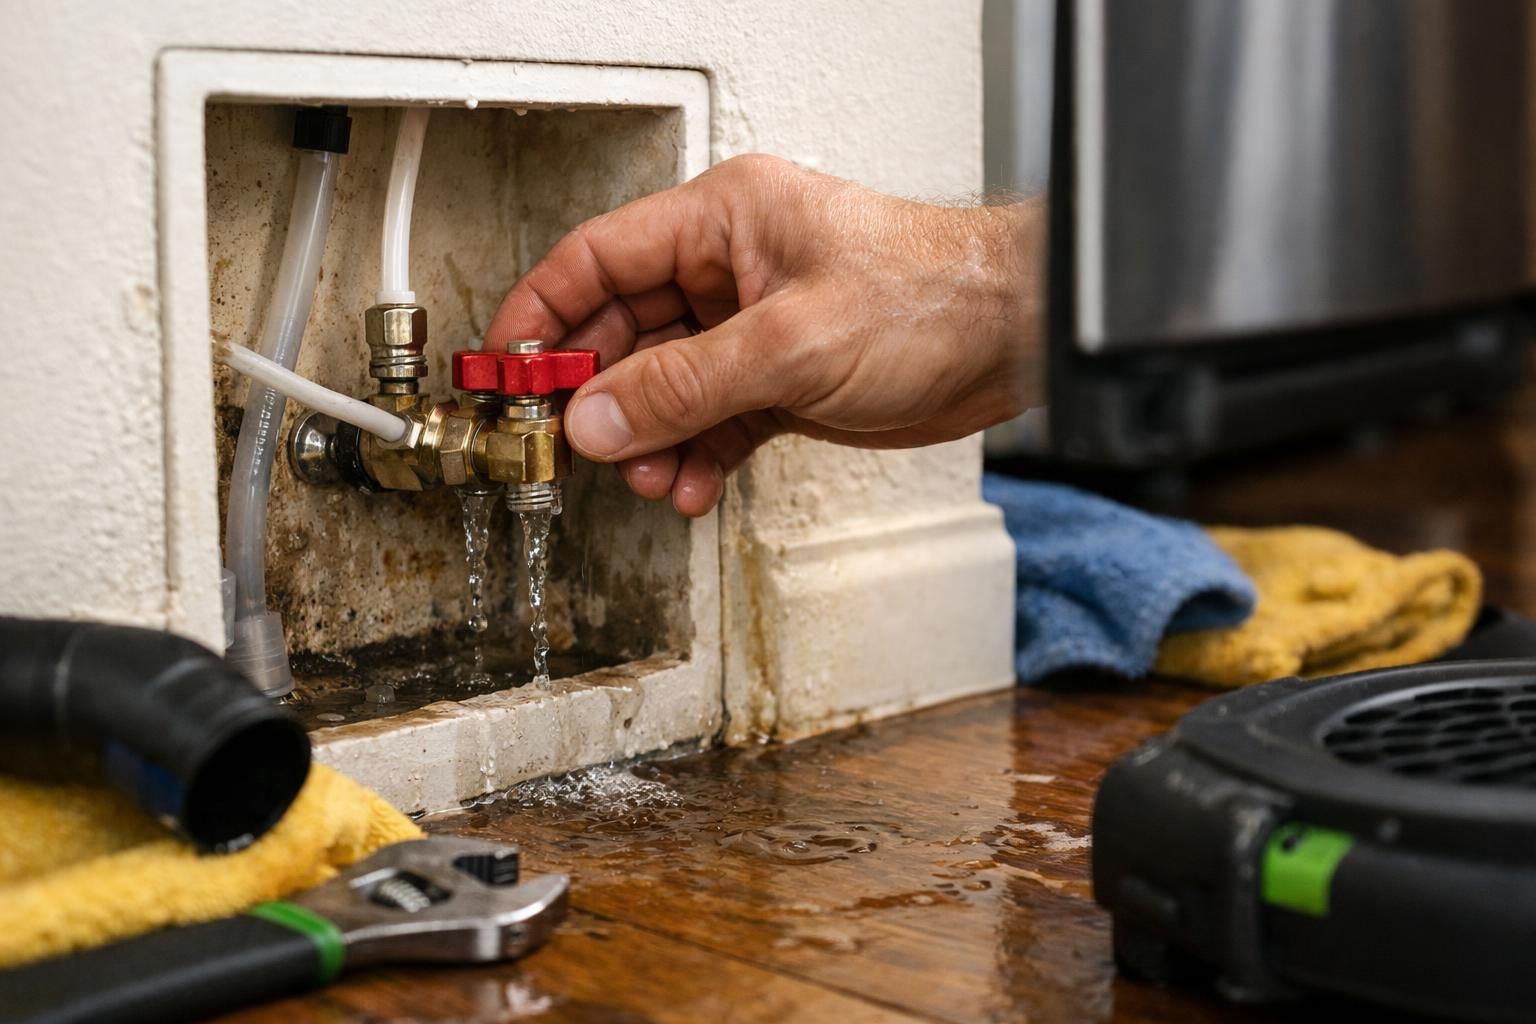
Stopping the leak at the source limits refrigerator water line leak water damage fast, because pressurized lines can add a lot of water quickly. Find the refrigerator shutoff valve (commonly behind the fridge, under the sink, in a basement ceiling below the kitchen, or near the cold-water tap point) and turn it fully clockwise. If you can’t find it quickly or it doesn’t stop the flow, shut off the home’s main water valve. Confirm the water is truly off by trying the dispenser or listening for the ice maker fill; no flow means the supply is isolated.
Stop the Source (valves, Shutoffs, and Power)
Stopping the source means shutting off the water feeding the fridge and preventing the unit from adding more water through an ice maker cycle. Look for a small stop valve behind the fridge, under the kitchen sink, in the basement below, or where the line tees off a cold-water pipe.
After you shut it off, confirm it worked. Dispense water at the fridge door if you have that feature, or check for continued sound of water movement. If it still flows, the valve may be failed or you shut off the wrong one, so move to the home’s main shutoff.
Next, identify the failure point so the repair is straightforward. Common culprits include:
- Loose compression nut on a copper line
- Cracked plastic tubing, especially at bends and stress points
- Failing saddle valve or worn stop valve packing
- Damaged braided stainless hose
- Leaking quick-connect fitting at the back of the fridge or filter head
Avoid “fixing” a damaged connection by cranking it tighter. Overtightening can deform ferrules, crack plastic, or strip threads, and the leak may return worse when pressure comes back.
Shut Off Water to the Fixture or Main (if Needed)
Use the dedicated fridge valve if it clearly stops flow. If you can’t confirm isolation quickly, shut off the main water. Speed matters more than elegance when water is spreading.
After shutting off, relieve pressure by opening a cold faucet briefly. Dry the suspect connection and place a towel under it so you can see whether it’s still weeping. If the valve drips from the stem after turning, note it as a separate repair item and consider it unreliable for future emergencies.
Turn Off Power to the Affected Area (if Needed)
Turn off power at the breaker if water contacts cords, outlets, power strips, or the wall area where wiring may run. Unplugging is only acceptable if you can safely reach the plug without stepping in water or reaching through a wet zone.
If you cut power, keep refrigerator doors closed to protect food temperature. Once the area is dry, restore power as needed to run fans or dehumidifiers plugged into a dry location.
Remove Standing Water and Protect Nearby Materials
Standing water is what quickly causes swelling, staining, and seam failure. Start with towels to control spread, then use a wet/dry vacuum if you have one to pull water from grout lines, textured vinyl, and low spots. Work from the outer edges back toward the source so you don’t push water farther.
Remove rugs and floor mats and clear items stored in base cabinets so they don’t wick moisture. If cabinet bases are wet, remove the toe-kick if possible and elevate items with shims, foil, or plastic. If you can access the underside of cabinets, even a small amount of trapped water can linger and create odor.
Water often travels along low points and shows up at transitions or near another appliance like a dishwasher. If you see dampness elsewhere, it may be spread from the same leak rather than a second issue. This guide on stop water from spreading can help you trace likely paths.
Check Hidden Water in Cabinets
Assume water entered cabinet bases even if the puddle looks small. Open nearby base cabinets, remove contents, and feel along cabinet bottoms and corners for dampness, softness, or swelling. Pay attention to particleboard, which deteriorates quickly once wet.
If the toe-kick is removable, take it off and inspect the void with a flashlight. Water can sit there unnoticed and keep humidity high. Leave cabinet doors open and aim a fan so air moves into the cavity without trapping humid air inside.
Check Hidden Water in Cabinets, Walls, and Flooring Edges
Hidden moisture is what turns a quick cleanup into lingering odor, warping, or mold risk. Check cabinet bottoms, toe-kick voids, and the wall behind the fridge first, since leaks often run along the back before surfacing.
Then check flooring edges and transitions. Laminate and engineered wood tend to show damage at seams, while vinyl may look fine on top but trap water underneath. Press a paper towel into corners and along baseboards to see if it picks up moisture. Look for early changes like discoloration, swelling, or a spongy feel.
Signs water may be in assemblies you can’t easily dry include:
- Baseboards swelling or separating at joints
- Bubbling paint or soft drywall near the floor
- Cabinet side panels bowing near the toe-kick
- Persistent damp smell after surface drying
If you’re unsure whether the moisture you found is minor or a bigger issue, start here: signs of hidden water.
Drying Setup: Airflow Plus Dehumidification (not Just Heat)
Effective drying is airflow across wet surfaces plus dehumidification to remove moisture from the air. Fans without dehumidification can leave the room humid, slowing evaporation. High heat can create uneven drying and may worsen warping or drive moisture deeper.
Aim fans to skim air across the floor and toward open space. If you opened a toe-kick or cabinet cavity, direct airflow into it and keep cabinet doors open so humid air can escape. Avoid sealing up wet cavities while you “wait and see.”
Run a dehumidifier nearby, keeping the area as contained as practical. Empty the bucket often or use a drain hose if available. If it’s humid outside, opening windows may slow progress, so judge by whether the space feels drier and surfaces stop feeling cool or clammy.
A sour or musty smell often means moisture is still trapped; this can help you interpret it: what that damp smell means.
What Materials Can Usually Be Saved vs Replaced
Many materials can be saved if you catch the leak early and dry thoroughly. The key is whether the material can return to stable shape and be dried through its full thickness, not just at the surface.
Often salvageable with quick action:
- Solid hardwood cabinets if only lightly wetted
- Tile floors and sealed concrete if underlayment didn’t saturate
- Drywall that’s only surface-damp with no softness
- Solid wood baseboards if removed and dried
Often replaced or partially rebuilt after prolonged wetting:
- Particleboard cabinet bottoms and toe-kicks that swell and crumble
- Laminate flooring that’s cupped or separating at seams
- Carpet pad, which holds moisture even when carpet feels dry
- Insulation in wall cavities wetted from the bottom up
A practical rule: swelling, delamination, or loss of structure usually means replacement. If you can’t access a layer to dry it, replacement may be the only way to eliminate hidden moisture.
When to Call a Water Damage Restoration Pro
Call a restoration pro when water likely entered cavities you can’t dry well, or when safety and contamination risks are uncertain. A small, open-area leak is manageable; water under cabinets, behind walls, or under flooring across a wide area is harder to control.
Get professional help if:
- Water reached outlets, a breaker panel area, or fixtures below
- You can’t stop the leak quickly, or the shutoff won’t fully close
- Floors are buckling, cabinets are swelling, or drywall is soft
- Odor or high humidity persists after fans and dehumidification
- The leak sat overnight or longer before discovery
To understand what they typically do, see: restoration process steps.
What to Document for Insurance and Repairs
Good documentation shows source, scope, and timeline without guessing. Take wide photos showing the fridge location, any water behind refrigerator areas, and the visible wet path. Then take close-ups of the leak point, supply line, shutoff valve, and damaged materials like swollen trim or cupped flooring.
Keep simple notes: when you first noticed water, when you shut off the valve, and what you did (wet vac, towels, fans, dehumidifier). Save failed parts like the cracked tube or leaking fitting in a bag for a plumber to inspect.
For insurance, keep it clear:
- Photos before cleanup and during drying setup
- A basic sketch of affected areas (kitchen, adjacent rooms, below if applicable)
- Receipts for supplies and any professional visits
- A brief description of what failed (supply line leak, valve leak, etc.)
Coverage depends on cause and policy details. Use this as a starting point: does insurance cover water damage.
Preventing a Repeat Leak
Preventing a repeat fridge line leak comes down to better materials, safer routing, and quick routine checks. If you have old plastic tubing, replacing it with a more durable line and quality fittings is often the best upgrade, especially if it’s kinked or rubbing the wall.
When sliding the fridge back, keep gentle slack so the line won’t pinch, and avoid sharp bends that stress the same point. If your shutoff is a saddle valve, consider replacing it with a proper stop valve that closes reliably.
A simple routine helps:
- Look behind the fridge every few months for dampness or mineral tracks
- Check floor edges and toe-kicks after moving the fridge for cleaning
- Replace water filters on schedule to keep flow and pressure stable
- After remodeling or moving the appliance, re-check line routing to ensure nothing is kinked, pinched, or rubbing against the wall.
Conclusion
If you handle refrigerator water line leak water damage in the right order, you usually prevent the expensive part: moisture that hides, spreads, and lingers. Stop the water, keep electricity and slips in mind, remove standing water, then dry with airflow plus dehumidification. After that, document what happened and fix the weak link in the supply line so it doesn’t happen again.